Install Modeler
This guide will help you install Syside Modeler. It covers system requirements, installation steps, license activation, and updating. For Modeler CLI install instructions, see Install Modeler CLI.
Syside Modeler is available on the VS Code Marketplace and Open-VSX Marketplace. For full installation instructions, see the sections below.
Minimum Requirements
System requirements:
Windows 10+ x64 or arm64 (for older versions, install Windows UCRT)
System requirements:
macOS Big Sur (11.0+, arm64)
macOS High Sierra (10.13+, x64)
System requirements:
Linux x64 distribution with GNU C Library
glibc >= 2.31
Note
Some Linux distributions like Alpine and Chimera do not include
glibcand may not support running applications that require it.How to check your glibc version
Using gcc:
$(cat $(gcc -print-file-name=libc.so) | grep -P '/[^\s]+/libc\.so\.[\w]+' -o)
You should see output similar to:
GNU C Library (GNU libc) stable release version 2.40Using Python:
python -c "import platform; print(platform.platform())"
You should see output similar to (glibc should be printed at the end):
Linux-6.13.7-3-cachyos-x86_64-with-glibc2.41
Development environment:
Visual Studio Code (recommended)
Software requirements:
Java 21 runtime
Tip
During online installation, Syside Modeler will offer to install Java automatically. For offline environments, Java must be installed manually (see Offline Installation).
Network connectivity:
Internet connection is required for installation, updates and usage
Note
Syside Modeler periodically validates license and collects basic usage data: launch time, and hashed machine ID (not personally identifiable).
Syside Modeler can be used offline for short periods of time, but a fully network-isolated solution requires an offline license available on the Business plan.
Install Extension
Warning
Syside Modeler shares some features with Syside Editor. To avoid conflicts, please uninstall/disable Syside Editor before using Syside Modeler.
For network-isolated or air-gapped environments, see Offline Installation page.
Open your editor (Visual Studio Code, Cursor, VSCodium, or other compatible editor)
Open Extensions view (click in left sidebar or press Ctrl/Cmd-Shift-X)
In the search bar, type Syside Modeler
Click Install on Syside Modeler by Sensmetry (identifier sensmetry.syside-modeler)
Syside Modeler is available on both VS Code Marketplace and Open-VSX Marketplace.
Download Syside Modeler extension (may take a few seconds to start)
Open Visual Studio Code or your preferred VSCodium-based editor
Open VSIX installation window:
via Extensions view:
Click in left sidebar or press Ctrl/Cmd-Shift-X
Drag and drop the downloaded
syside-modeler-*.vsixfile to the Extensions panel (alternatively, click … and Install from VSIX…)
via Command Palette:
Open the Command Palette Ctrl/Cmd-Shift-P
Type Extensions: Install from VSIX…
Select downloaded
syside-modeler-*.vsixfile and click Install
Warning
Extensions installed from VSIX files do not receive automatic updates. To update Syside Modeler, see Update Modeler section.
Activate License
When first trying to use Syside Modeler you will be prompted to provide the license key. To trigger the prompt manually, follow these steps:
Open any
*.sysmlSysML fileYou should get a prompt next to Command Palette asking to enter Syside License Key.

Enter Syside License Key and press Enter
If license activation succeeds, a confirmation message will appear:
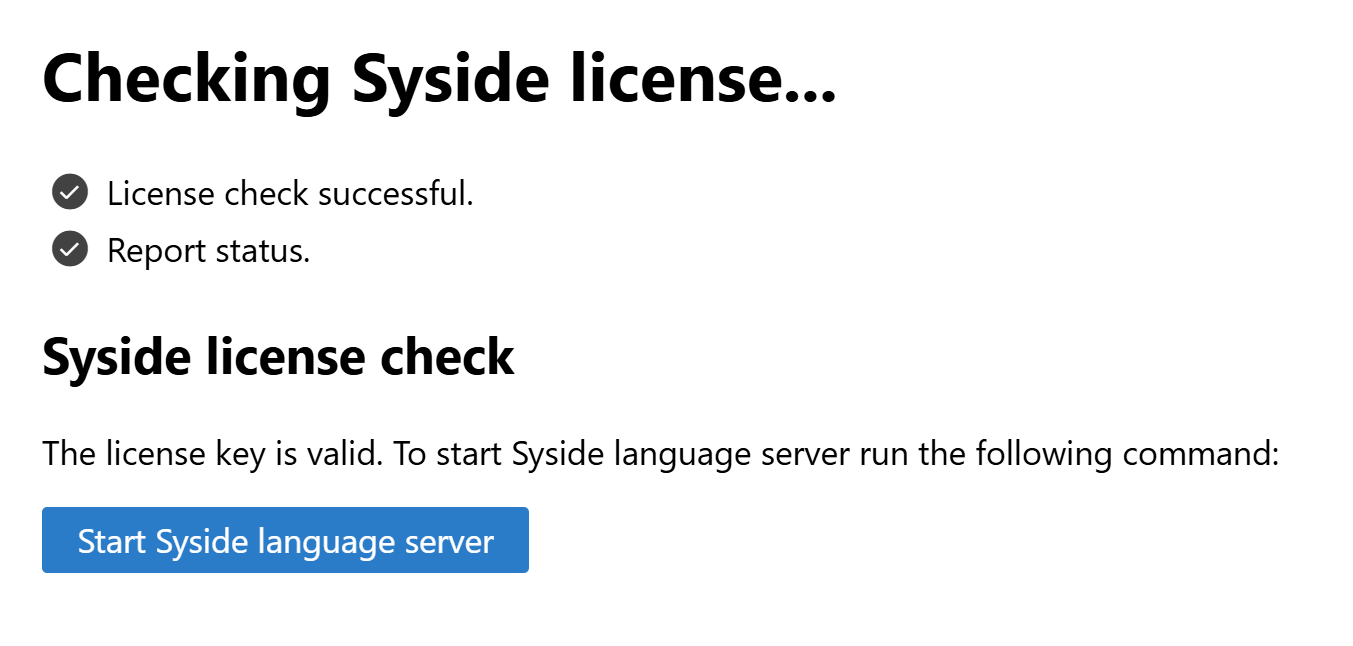
If license activation fails, an error message appears. Verify your license key and try again.
If the issue persists, check Troubleshooting section for potential solutions.
If you get a popup asking to install Syside Tools, click Install Syside Tools
If you did not get or dismissed the prompt, you can install Syside tools manually:
Open the Command Palette Ctrl/Cmd-Shift-P
Type Syside Modeler: Install Syside Tools
If you plan to use Modeler CLI or Automator outside your editor, you can add your license key to your Operating System’s secret storage:
Open the Command Palette Ctrl/Cmd-Shift-P
Type Syside Modeler: Add Syside license key to keyring
Verify Installation
Once Syside Modeler is installed and activated, follow these steps to quickly verify it is working as expected.
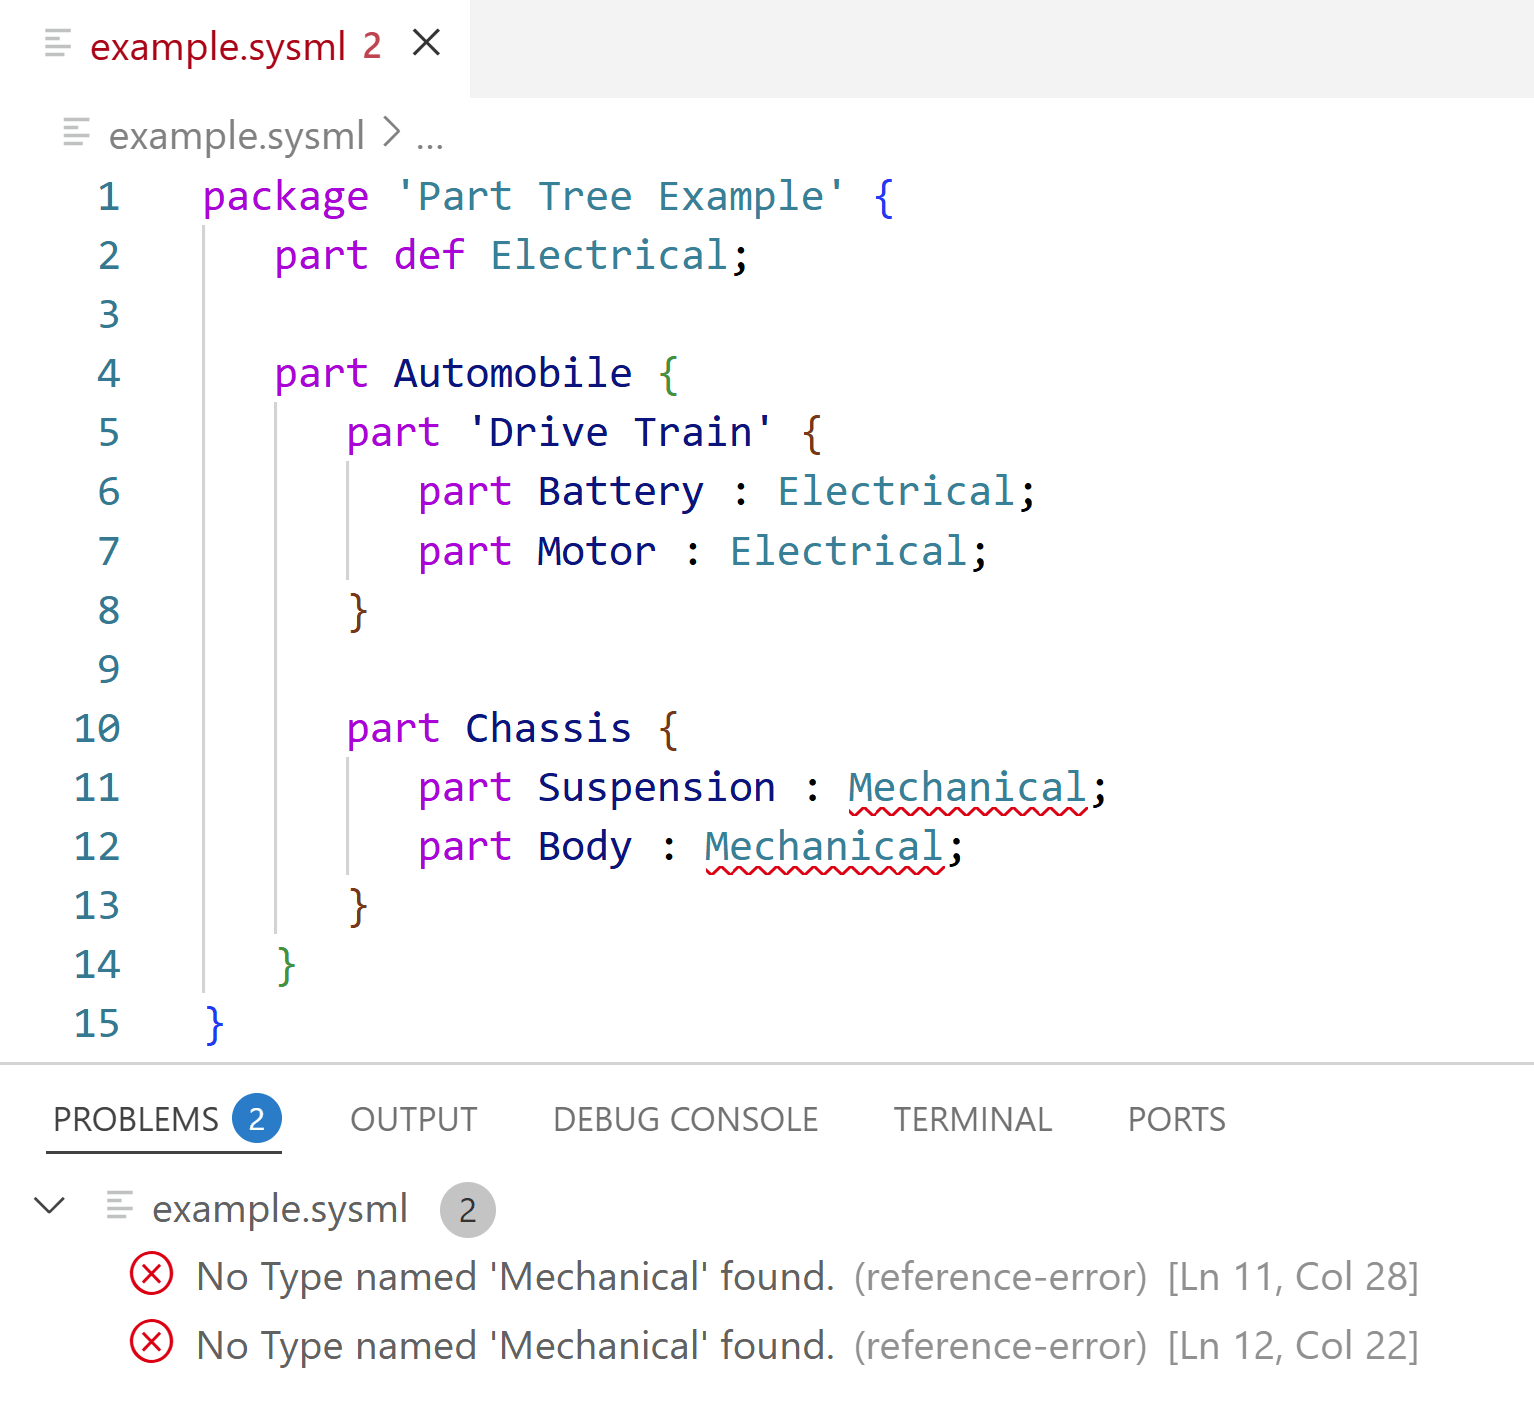
Create a new SysML file named
example.sysmlwith the following content:package 'Part Tree Example' { part def Electrical; part Automobile { part 'Drive Train' { part Battery : Electrical; part Motor : Electrical; } part Chassis { part Suspension : Mechanical; part Body : Mechanical; } } }
Open
example.sysmlfile in your editorYou should immediately see highlighted syntax and two errors in the terminal. This is because
Mechanicalpart definition is missing.
Correct the error by updating the
example.sysmlfile:package 'Part Tree Example' { part def Electrical; part def Mechanical; part Automobile { part 'Drive Train' { part Battery : Electrical; part Motor : Electrical; } part Chassis { part Suspension : Mechanical; part Body : Mechanical; } } }
The errors should disappear.
Save the file (Ctrl/Cmd+S). The visualization engine reads the saved file, so unsaved changes will not appear in the diagram.
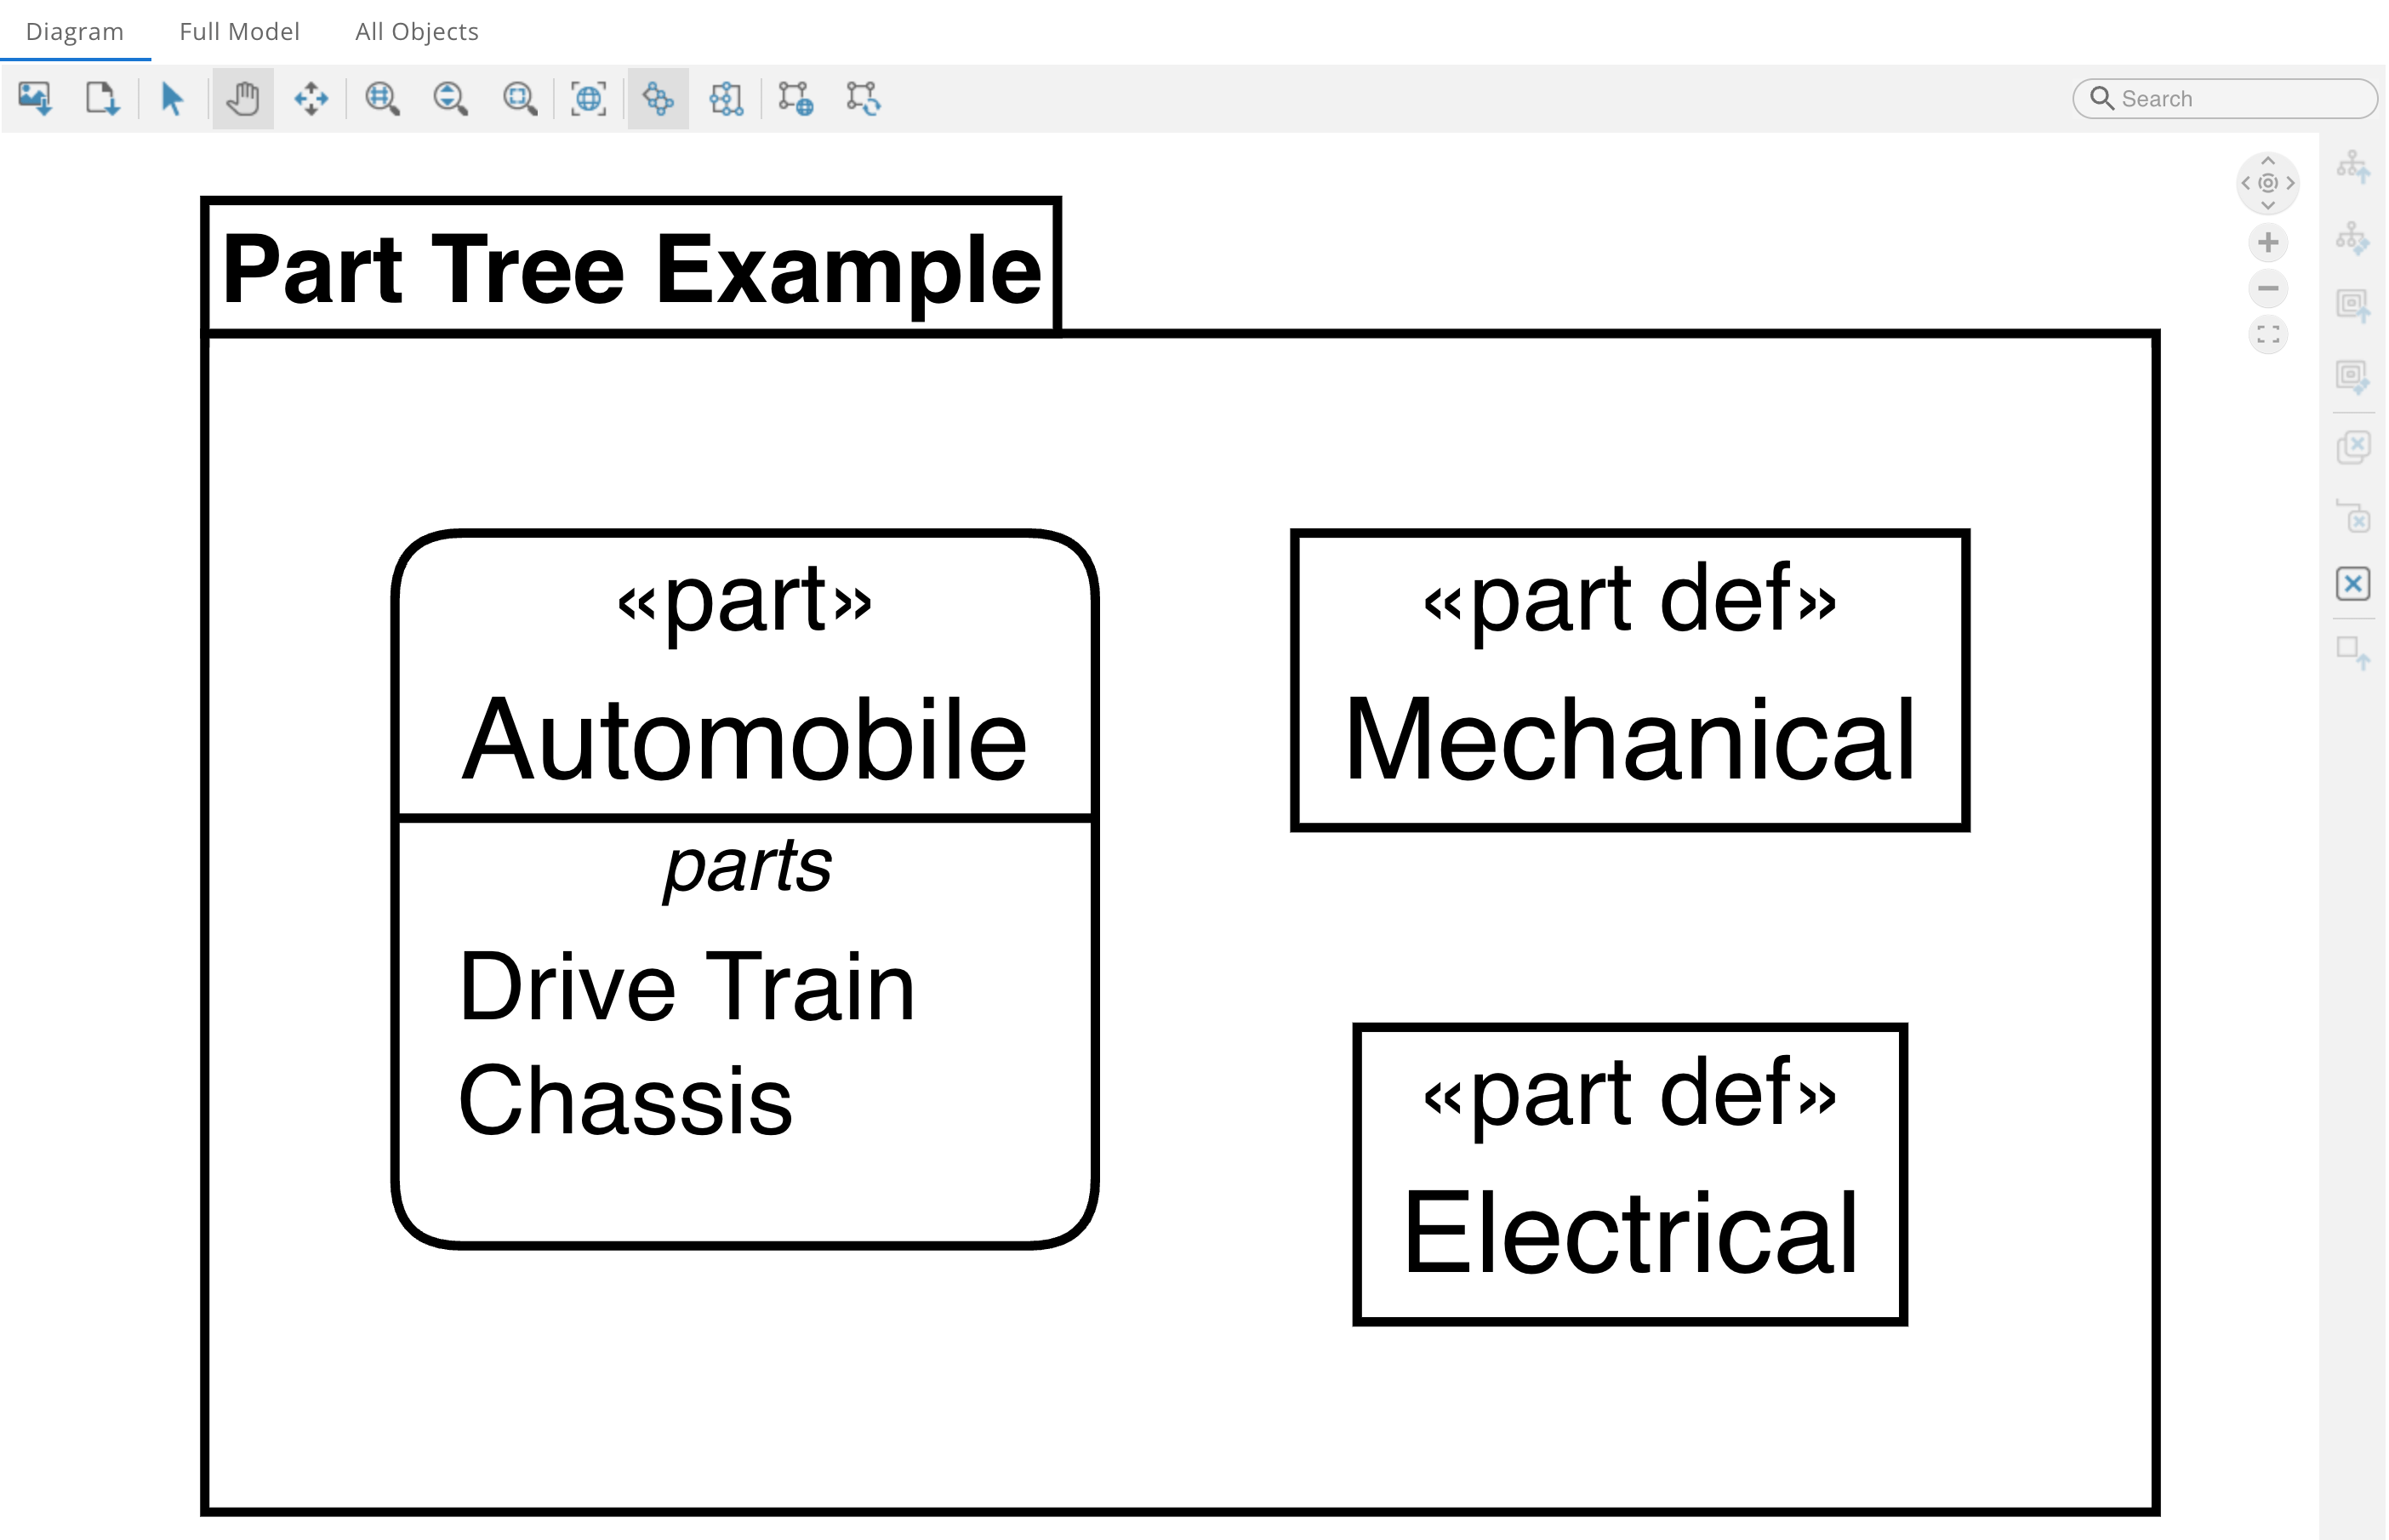
Visualize the model:
Click on Syside logo (top right) and select Visualize current file
Alternatively, use keyboard shortcut Ctrl/Cmd+Shift+V
Tip
If Java is not yet installed, Modeler will prompt you to install it. Follow the on-screen instructions, then repeat Step 3.
Once loaded, you should see a diagram similar to this:
Update Modeler
By default, your editor updates extensions automatically. You only need to reload the extension after the update completes.
If you are not receiving automatic updates:
Open Extensions view (click in left sidebar or press Ctrl/Cmd-Shift-X)
Find Syside Modeler in the list
Verify the Auto Update checkbox is enabled
Extensions installed from VSIX files do not receive automatic updates.
To update, download the latest version and repeat the Install Extension steps above.
Tip
Your license activation and settings will be preserved during the update.
What’s Next?
Now that Syside Modeler is installed and working, continue to learn more:
Learn SysML v2 with Advent of SysML v2, a free 25-lesson course with videos, blog posts, and hands-on exercises
Check out the Essentials section to learn about visualization, navigation, and core modeling features
Check out the Configure Modeler section and configure Modeler for your use case
Check out the Modeler CLI section to learn about using Modeler CLI
Check out Tips and Tricks for advanced editing productivity tips
Explore Automator to learn about automation and scripting features